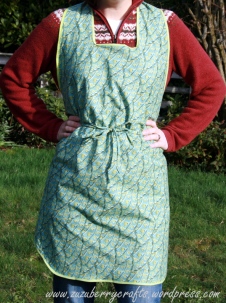
After finishing the Windows Improv table runner for a friend’s bridal shower, I needed a quick and simple gift idea for my friend’s birthday, which was just days after the bridal shower. Cue this is a simple apron made from a vintage pattern. I searched high and low for a fabric that felt right, both for the large size of fabric and the person I was buying it for. It turned out well enough, but it was more of a challenge than I bargained for.
THE PATTERN
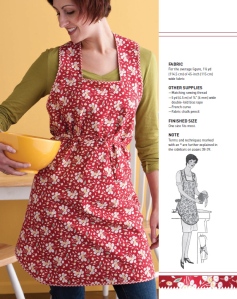
Magic Pattern: The Slip-over Apron, Fashion Service, 1929, by Amy Barickman from the Spring 2010 issue of Stitch magazine. A Magic Pattern is one that you draw and cut for yourself, or cut directly from fabric using measurements and diagrams provided as a guide, which, for me, produced more difficulty than imagined before starting. This pattern first appeared in Amy Barickman’s Vintage Notions: An Inspirational Guide to Needlework, Cooking, Sewing, Fashion, and Fun. Overall, I’d rate this pattern at least an Intermediate level, depending on your pattern drafting experience, comfort with lack of clear directions, and experience with a french curve (see CHALLENGES below for more info).
 TYPOS
TYPOS
There weren’t any typos per se, but the pattern calls for 1-1/4 yards of fabric but it turns out you only need a square 36″ to make the pattern. I spent a ton of time looking for a fabric that I could have cut to size to make this pattern only to realize when I started on the pattern that I could have used that yard of fabric sitting on my shelves that was 38″ long and could have easily been cut down to size, but I hadn’t thought it large enough. I’m sure the extra yardage is to ensure that you have enough to meet the minimum requirements, especially after washing.
CHALLENGES
Cutting the apron: This seemed simple enough at the start, but unless you’re a beginner sewer with oodles of experience using a Dritz Styling Design Ruler, aka French Curve (an artist might), this is nowhere near a beginner or even intermediate pattern. This pattern will best serve the sewer who knows their way around a french curve, which is used for making adjustments to patterns – like enlarging an armhole – or drafting your own patterns. Though, if you’re adventurous enough and fairly forgiving of yourself, like me, you too can complete this pattern.
I will give Amy this, the step-by-step instructions for sketching the different sections were good. I didn’t label each point with a letter, but I felt like I followed the progression well enough. It was drafting the curvy lines that I struggled with. I, in all my innocence, thought that if you used a french curve, the curves in the pattern would simply follow the curve of a french curve. Lay it down, draw, done. But no, it’s not that simple. I had to adjust the guide over and over again to get the right angle from one point to the next. I was frustrated to say the least.
It helped to stand back from the pattern and look at the lines on the fabric and compare them to the provided diagram. You get a sense of the overall pattern that way. Eventually I just had to say, “good enough”, and start cutting, hoping for the best.
 Making the apron: If you thought that drafting the pattern was hard enough, following this simple pattern should have been a piece of cake. But I found the instructions lacking enough detail as if it assumed a knowledge I didn’t have. I would have preferred some more diagrams to illustrated what they were talking about. As it was, the one illustration provided for how to attach the apron strings led me down a path to making a mistake.
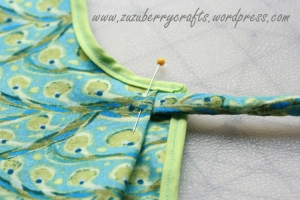
So you’re supposed to put two 3/8″ folds into each side of the center back in the skirt section of the apron. It took me a long time to figure out where exactly those folds were supposed to go, and maybe I was still wrong because I didn’t have a lot of fabric on that downward slope towards the corner.
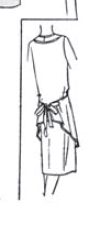
There is a sketch of the supposed apron from the 1950s that was smaller than my pinky. I looked at that sketch and all the folds in the back side and then I looked at the diagram showing me how to insert the apron string in the fold and ended up putting only one fold on each side. Oops. Supposedly, two were supposed to produce a flowing and billowed back side of the one-size-fits-all apron – but I don’t believe it. So don’t follow my picture above – put TWO folds in on the end of the sloping run and insert the apron string into one of them (probably the outside one??).
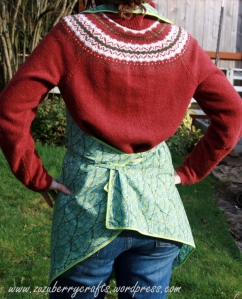 I don’t think the backside turned out the way it was supposed to and I’m pretty sure another 3/8″ fold would have fixed the problem. I had inches of extra fabric in the back, which either stuck out or laid flat like in the picture. I guess it’s okay, but it’s nowhere near the sketch they provided. I feel a bit like a failure and considering my friend is essentially the same size as me, I don’t know how she’ll like it.
Quality: Lastly, I have to say, that an apron made out of one piece of cotton fabric feels a bit cheap to me. I like my aprons hearty, that I can wipe my hands on. My friend is a foody, though, and maybe that means she’s less of a messy, hearty cook/baker than I am. I can only hope that she likes it. It would make a good hostess apron rather than one you’re going to get your hands dirty in.
RECOMMENDATIONS
If you’re up for a challenge and you like the look of this vintage apron, this is a good pattern to try. If you are really skilled at drafting, you might even figure out how to take out some of the excess fabric in the back before you go and finish the apron with binding.
